by Heather Green
Airbrush Tattoos are a fun way to live out your tattoo dreams without the commitment. Most people have only seen airbrush tattoos in tourist destinations or theme parks. As the face and body art community and industry, continues to grow so does the availability of these creative services.

I fell in love with Airbrushing 10 years ago. I loved being able to offer waterproof face and body art, and it helped me expand to a whole new market. During the summers in South Florida ( where I am located). Face painting slows down because it is so hot. I learned to airbrush more so out of necessity, than actual interest. I found that I picked it up rather quickly because there was less artistic skill needed, than with face painting. Airbrush tattoos involved using stencils and coloring in the lines, which is something most people can do.

Soon after, I fell in love with Airbrushing I found out the hard way, there is a lot more that goes into airbrushing that just coloring inside the lines. Unlike face painting, Airbrushing Tattoos involve a lot more equipment. At, first I was intimidated by all the tools and supplies needed to set up a professional system. Once I figured out everything I needed, it all came together nicely. Fast forward 10 years, I am excited to share with you some ideas, short cuts and explain how to use, clean, and what stencils you might want to add to your Airbrush life.
Supplies
Airbrush Guns: My suggestion is if you want to offer professional airbrush tattoos then invest in good Airbrushes ( my favorite is Iwata brand) . The reason I say this is because, Airbrushes will be your best and worst enemy. The less quality they are, the more they tend to clog and give you troubles. Iwata is reliable, parts are easy to replace and they work great with face & body make up. I have had my original guns for 10 years and have only replaced the cones and needles.
![]()
Compressors and CO2 tanks: You will need an air supply. You can hook up your guns to a compressor for air or a CO2 tank. I recommend a CO2 tank and not an oxygen tank because Oxygen is flammable and you need a license to transport it. Co2 is common, affordable and non flammable. I use a 20lb Co2 tank and can connect 6-9 guns with even pressure. It will last me at least a month or more. When using a CO2 tank, there is no electricity required which is good for those that won’t have access to electric. Otherwise you will need a compressor. I personally use a Iwata Smart Jet Pro, where I hook up 6 guns and a manifold ( air splitter). I love my Smart jet pro because its relatively silent, lightweight, it has an auto shut off to preserve the motor from overheating and its lasted me 10 years. I have also used a Passche compressor and it worked well as well.

If you start off with a smaller compressor you will need to buy a new one when you want to use more than one gun at a time. Smaller compressor that do not have an auto shut off, ten dot over heat unless you are careful about turning them off when not in use. I suggest deciding your airbrush goals before buying a compressor so you don’t waste your money buying something too small.
Set up: When I started airbrushing, there was very little in the way of good set ups. There was a huge bamboo system I bought. There was a table clamp to hold my guns, and there was a few custom holders. After my first couple of gigs I decided to create a professional system that looked good and was functional. I LOVE our Airbrush case. Its table top, it holds everything and is easy to transport and set up. You might have to do your research until you find something you love. Personally I love our system, 
but I am biased since I created it. We have a very creative industry, where artists are always building and designing. I suggest checking out Eder Bean Arts 
page to see his set up and this video to show you the one I created and you can decide what works best for you.

https://www.youtube.com/watch?v=NSuDqP8s4a8
I also wrote a really good blog a while back you can check it out here

Stencils!:
Stencils are a vital part of your airbrush system. You can have the best paint, guns and hoses but if you don’t have a great assortment of stencils then you will be selling short the magic of airbrush tattoos.
10 years ago, adhesive stencils sold in a large book were very popular.

They were easy because they stuck to the skin and were available in a large variety. But we soon found that they didn’t last very long and if the skin had oils, like sun block or too much lotion it would ruin the sticky stencils. Then manufacturers started selling Mylar ( plastic stencils) The downside was you had to learn to use them, the upside is they last forever with proper care. Fast forward to today, there are so many amazing stencils, the hardest part is choosing which stencils to include in your kit.

Some important things to note about stencils:
– The best, most durable stencils are made with a 5ml or higher mylar. Under 5ml, just means they are very thin and fragile. All of the stencils we sell are over 5ml, but just in case you are shipping on wish or ali express its good to know that 3ml is really thin.
– I clean my stencils in an ultrasonic cleaner. It shakes them clean in under 5 minutes. HOWEVER, I have to turn off the heater on the ultrasonic when I am cleaning them because you can melt your stencils if you aren’t careful and heat them up. I recommend, soaking them in alcohol or placing them without heat in the ultrasonic
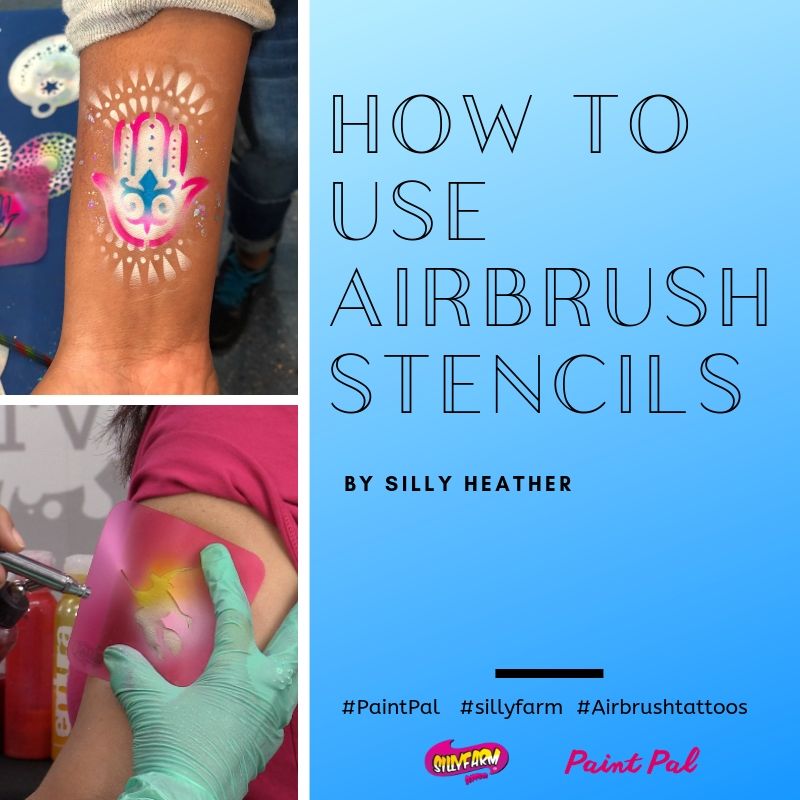
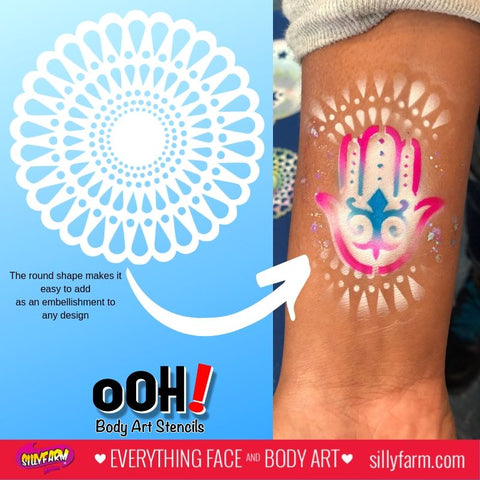
Organizing stencils– I use a large banner to show

off my choices and to make my services stand out. I love my airbrush banner. It’s easy to carry and set up and gives my customers lots of choices. I carry my stencils in a portable file cabinet. I separate each set in a file folder and this system helps me work fast and effective. I place it next to my set up for easy access and I have yet to have a problem.

However you choose to display your stencils, my only suggestion is do not allow kids to touch them or hold them while they are waiting. More than likely you will end up losing or ruining your stencils if you let them change hands.

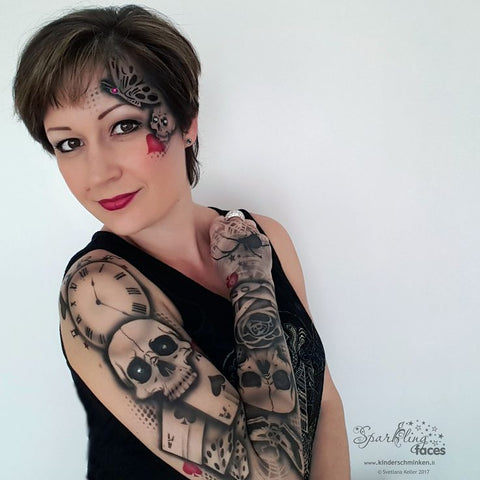
I also LOVE the stencils called Tattoo Pro Stencils designed by Wiser. They are realistic tattoo stencils that look amazing on the skin. My teen and adult customers go crazy over them and I can charge more since they are very detailed. They may seem intimidating at first but I promise once you get the hang of them you will fall in love! They are so creative and really make you feel like an artist. I also file my Tattoo pro stencils in a portable file case for easy access. I keep them away from everyone because there are so many small pieces, in each set so I try to take great care of them.

I won’t lie, after a while I started getting bored with my stencil board, and then Ooh stencils came onto the scene. They are exactly what I needed to add some fun and creativity back into my tattoo selection. ( When I am not using Tattoo pros) ooh stencils are round stencils great for adding details, embellishments and accents to your face painting and airbrush tattoos. The round shape makes it easy to add them around the edges and outline your designs. They really take your designs to the next level.


I also love to add a touch of glitter and Pixie Paint to my tattoos when I am finished. The girls love it and its great for photo ops. The glitter washes off, even when the tattoo stays. But it’s fun for the moment and pretty too.
There is no shortage of variety when it comes to Airbrush Tattoo stencils. We have an entire section on the site that features textures, designs, patterns and more. The cool part about most airbrush tattoo stencils is they can also be used for face painting. We designed our line of Pink Power stencils to be versatile enough to use for both face painting and airbrush tattoos. The way to tell if they can be used for both, is how large the boarder is on the design. When you airbrush, you will want at least a 1.5 inch board around the design to catch the “overspray”, which is the extra paint floating. If the stencil doesn’t have a large enough boarder you will see the extra paint create an fuzzy border and you’ll spend time cleaning it off. Another important thing to note is, if you use a stencil for airbrush typically the paint is thicker and can cake on the stencil. So I recommend either cleaning your stencils between airbrush and face painting, or having two sets or stencils.
So how do you use Airbrush Tattoo stencils?
The great news is we have lots of tutorials in our video channel to help you on everything from using Tattoo pros to organizing your set up.
Click here to view our free videos. https://www.youtube.com/user/sillyheatherb/search?query=airbrush
Wiser also has a great group and channel to help you with ideas and designs: https://www.facebook.com/TattooProStencils/
If you are REALLY serious about learning to airbrush I HIGHLY recommend investing in a month of FABAtv and watching all the amazing Airbrush classes. We have classes on everything from set up, to airbrush face painting, body art and more. Here’s the link http://www.fabatv.com/by-subject/4/airbrush-techniques
Here is a little guide to help you use Airbrush stencils

1) Hold the stencil in place. If you can’t hold the entire stencil down flush with the skin, then choose a corner.
2) As you spray, roll your fingers over the next area of the stencils so that the design is flush with the skin.
3) Avoided spraying over lifted edges or you will have extra paint and a fuzzy edge.
Tip 1: I always spray white first ( unless it’s an all black tattoo) By spraying white down first all the other colors will pop and you can create cool offset effects by spraying down white and then slightly shifting the stencil and spraying colors on top. When you are done it will look like a glowing floating shadow.

Tip 2: Airbrush Tattoo make up is water proof and Hybrid make up has good staying power. For the best results, its good to remove any oils from the skin first. I wipe down the arm or surface with an alcohol wipe before I spray the tattoo, that way to paint will last the longest and the oils wont disrupt the paint.

Tip 3: When layering stencils, like a Tiger or Ying Yang I suggest either allowing the first layer to dry or using baby powder on the first layer before layering the stencil. I filled a sock with baby powder and use that to dab on the first layer of paint, and the powder sets and dries the paint immediately. The powder briefly changes the color of the paint but it fades quickly and the original color goes back to normal.

Tip 4: I have always loved to add glitter to my tattoos, one way to keep the glitter organized on the design is to poof on glitter before removing the stencil. The upside is, your design will shine the downside is glitter can start to stick to the wet paint on the stencil and cake up. So make sure you dust off extra glitter before paint dries on the stencil to avoid thick cakey stencils.

Tip 5: I mentioned how I clean my stencils above ( see Ultrasonic cleaner), but if you do not have an ultrasonic cleaner I suggest soaking your stencils overnight in alcohol (91%) in a covered tupperware and then patting them dry. If you are going to throw them in the ultrasonic like I do, don’t forget to turn off the heater or they will melt!
I hope this blog helps you on your airbrush journey. I love helping fellow artists and I love to help you save money and time. If you have any other airbrush related, face painting related or industry questions I am ALWAYS happy to help. Email, call or chat me. Visit my Facebook page, stay connected because together we are better!
Happy Painting
Heather Green

